Description
This tutorial explains you how to integrate the computer vision library OpenCV in the Dev-C++ IDE.At the end of this how-to, you will be able to use OpenCV to write C++ programs, which use webcams or other video sources and which can detect persons, motions, outlines of objects...
Please note: this tutorial refers to the OpenCV version 1.0rc1. See the modifications at the end of this page if you like to use the newer version 1.1pre1!
OpenCV (Open Source Computer Vision Library) is a C++ library from Intel for image processing.
The OpenCV library contains various algorithms and offers many applications:
- Face perception
- Outline analysis
- Hough transform
- Motion detection
- Object tracking
- ... and much more ...
Dev-C++ is a open source development environment (IDE) for C and C++.
The IDE runs with Windows and uses a varaint of the GNU-C++ compiler.
One of the greatest advantages is the clearly arranged user interface, which doesn't slow down your work with needless features and makes it easier for beginners to become familiar with it.
In this how-to I will assume, that you already have installed Dev-C++ on your system.
Installation of OpenCV
The first step is to download OpenCV from http://sourceforge.net/projects/opencvlibrary/.The version used in this tutorial is named "OpenCV_xyz.exe" and located in the package "opencv-win" (xyz stands for the version).
Direct link to the download of version 1.0rc1 (16 MB), auf welche sich diese Anleitung bezieht.
Now you must run the downloaded setup program. If you keep all default setting during installation (recommended!), OpenCV will be installed to C:\Program Files\OpenCV.
After the installation you'll need to reboot your system, due to changed path settings (C:\Program Files\OpenCV\bin).
You will find some example programs in C:\Program Files\OpenCV\samples\c.
Some of them require a connected webcam (or other video source) to work.
Configuration of Dev-C++
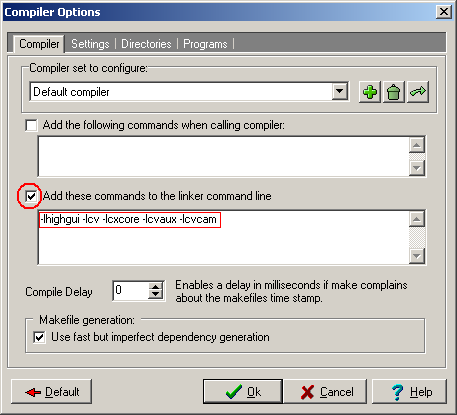
In Dev-C++ open the menu "Tools->Compiler options".In the first tab("Compiler") you need to check the box "Add these commands to the linker command line" and type the following line in the text bow below:
-lhighgui -lcv -lcxcore -lcvaux -lcvcam
Go to the sub-tab "Libraries" in the tab "Directories" and add there
C:\Program Files\OpenCV\lib to the paths:

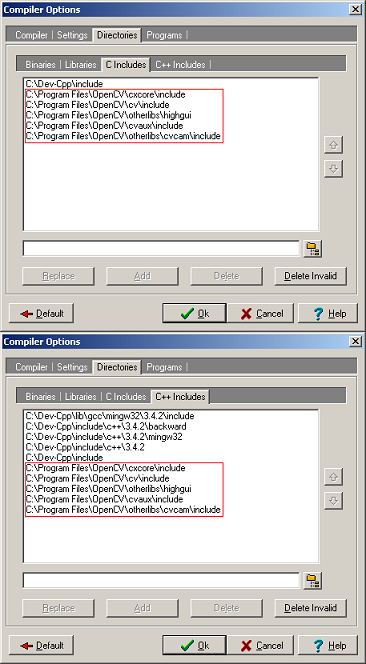
Now switch to the sub-tabs "C Includes" and "C++ Includes" and add this paths:
C:\Program Files\OpenCV\cxcore\include

C:\Program Files\OpenCV\cv\include

C:\Program Files\OpenCV\otherlibs\highgui

C:\Program Files\OpenCV\cvaux\include

C:\Program Files\OpenCV\otherlibs\cvcam\include
That's all!
Well, this wasn't too hard. Now you should be able to open a sample file - for e.g. C:\Program Files\OpenCV\samples\c\squares.c and compile and run it with Dev-C++ (F9).And of course you may modify it and do your own experiments with OpenCV...
You'll find the OpenCV documentation here: OpenCV documentation
Have fun!
Cypax
Links and files
OpenCV (Intel)OpenCV (Wikipedia)
OpenCV project (Sourceforge)
Bloodshed Dev-C++
Dev-C++ Resource Site
OpenCV Version 1.0rc1 (16MB)
Update: Modifications for OpenCV 1.1pre1
In the meantime there is a newer OpenCV version 1.1pre1 availabale on Sourceforge.There is no more cvcam library with this newer version. From the changelog:
[Windows] cvcam has been removed (as videoInput is now supported by highgui)
If you like to use this version you must notice the following points:
- During installation of OpenCV you will be asked whether the path C:\Program Files\OpenCV\bin shall be added to the PATH environment variable.
Please leave this checked (default). - After installation you should restart Windows to accept PATH changes.
- When configuring Dev-C++ do not add
-lhighgui -lcv -lcxcore -lcvaux -lcvcamto the linker command line. The correct phrase is:-lhighgui -lcv -lcxcore -lcvaux. Thus without -lcvcam! - Do not add path
C:\Program Files\OpenCV\otherlibs\cvcam\includeto the sub-tabs "C Includes" and "C++ Includes".
This path no longer exists with the 1.1pre1 version.