Beschreibung
In diesem How-To wird erklärt, wie man die Bildverarbeitungsbibliothek OpenCV in die Entwicklungsumgebung Dev-C++ integriert.Am Ende des Tutorials ist man dann in der Lage unter Verwendung von OpenCV C++ Programme zu schreiben, welche zum Beispiel mit einer Webcam (oder einer anderen Videoquelle) Personen erfassen, Bewegungen registrieren, ...
Bitte beachten: dieses Tutorial bezieht sich auf die OpenCV-Version 1.0rc1. Für die neuere Version 1.1pre1 sind die unten genannten Anpassungen zu beachten!
OpenCV (Open Source Computer Vision Library) ist eine C++ Bibliothek von Intel zur Bildverarbeitung.
(Bitte nicht verwechseln: die Bildverarbeitung wird genutzt um mit Hilfe von Algorithmen Informationen aus Bildern zu extrahieren - im Gegensatz zu Bildbearbeitung, welche sich mit der Manipulation von Bildern befasst.)
Die OpenCV-Bibliothek umfasst zahlreiche Algorithmen und Filterfunktionen und bietet viele Anwendungsmöglichkeiten:
- Gesichtsdetektion und -erkennung
- Konturenanalyse
- Hough-Transformation
- Erfassung von Bewegungen
- Objekt-Tracking
- ... und noch vieles mehr ...
Dev-C++ ist eine open-source Entwicklungsumgebung (IDE) für C und C++.
Die IDE läuft ab Windows95 und benutzt eine Variante des GNU-C++-Compilers.
Der größte Vorteil ist sicherlich die übersichtlich gehaltene Oberfläche, die bei der Arbeit nicht mit unnötigen Features aufhält und auch Anfängern den Einstieg erleichtert.
In diesem How-To wird davon ausgegangen, dass Dev-C++ bereits auf dem System installiert und lauffähig ist.
Installation von OpenCV
Der erste Schritt besteht darin, OpenCV von http://sourceforge.net/projects/opencvlibrary/ zu downloaden.Die in diesem Tutorial verwendete Version heißt "OpenCV_xyz.exe" und befindet sich im Package "opencv-win" (xyz steht dabei für die Versionsnummer).
Direktlink zum Download der Version 1.0rc1 (16 MB), auf welche sich diese Anleitung bezieht.
Nun muss das heruntergeladene Setupprogramm gestartet werden. Wenn alle Standardeinstellungen übernommen werden (empfohlen!), wird OpenCV in das Verzeichnis C:\Programme\OpenCV installiert.
Nach der Installation ist ein Reboot nötig, da die Pfadangaben erweitert wurden (C:\Programme\OpenCV\bin).
Im Ordner C:\Programme\OpenCV\samples\c befinden sich alsdann einige Beispielprogramme, welche ausprobiert werden können. Manche erfordern den Anschluss einer Webcam (oder einer anderen Videoquelle) an den Rechner.
Konfiguration von Dev-C++
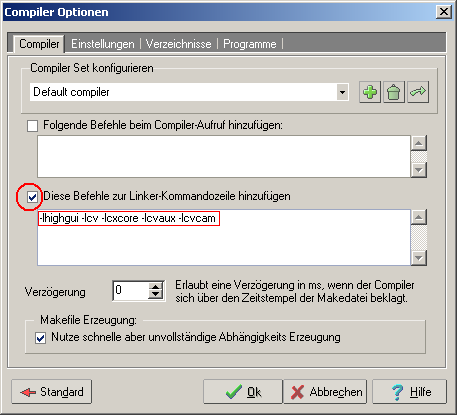
In Dev-C++ das Menü "Werkzeuge->Compiler Optionen" anwählen.Im ersten Tab ("Compiler") ist "Diese Befehle zur Linker-Kommandozeile hinzufügen" anzukreuzen und darunter
-lhighgui -lcv -lcxcore -lcvaux -lcvcam
einzutragen:

Im Tab "Verzeichnisse" ist im Untertab "Bibliotheken" der Pfad
C:\Programme\OpenCV\lib
hinzuzufügen:

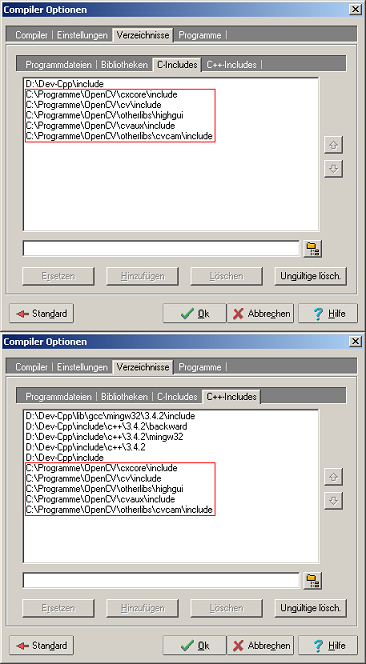
Nun sind noch in den Untertabs "C-Includes" und "C++-Includes" folgende Pfade hinzuzufügen:
C:\Programme\OpenCV\cxcore\include

C:\Programme\OpenCV\cv\include

C:\Programme\OpenCV\otherlibs\highgui

C:\Programme\OpenCV\cvaux\include

C:\Programme\OpenCV\otherlibs\cvcam\include

Das war's!
So, schon fertig. Nun kann man z.B. die Datei C:\Programme\OpenCV\samples\c\squares.c öffnen und mit Dev-C++ kompilieren und ausführen (F9) und natürlich auch ändern um etwas mit OpenCV herumexperimentieren...Die OpenCV-Dokumentation steht übrigens auch bei SourceForge zum Download: OpenCV-Dokumentation
Grüße und viel Erfolg,
Cypax
Links und Dateien
OpenCV (Intel)OpenCV (Wikipedia)
OpenCV-Projekt bei Sourceforge
Bloodshed Dev-C++
Dev-C++ Resource Site
OpenCV Version 1.0rc1 (16MB)
Update: Anpassungen für OpenCV 1.1pre1
Zwischenzeitlich ist eine neuere OpenCV-Version 1.1pre1 bei Sourceforge erhältlich.Bei dieser Version gibt es keine cvcam-Library mehr. Auszug aus dem Changelog:
[Windows] cvcam has been removed (as videoInput is now supported by highgui)
Wenn diese Version verwendet werden soll, sind daher folgende Punke zu beachten:
- Bei der Installation wird gefragt, ob der Pfad C:\Programme\OpenCV\bin zur PATH-Variablen hinzugefügt werden soll.
Bitte angewählt lassen (Default). - Nach der OpenCV-Installation wird i.d.R. ein Neustart notwendig sein, um die PATH-Änderung zu übernehmen.
- Bei der Konfiguration von Dev-C++ muss zur Linker-Kommandozeile nicht
-lhighgui -lcv -lcxcore -lcvaux -lcvcamhinzugefügt werden, sondern-lhighgui -lcv -lcxcore -lcvaux. Also ohne -lcvcam! - Außerdem ist in den Untertabs "C-Includes" und "C++-Includes" nicht der Pfad
C:\Programme\OpenCV\otherlibs\cvcam\includehinzuzufügen.
Dieser Pfad existiert bei der neuen Version nicht mehr.